MHA 简介
MHA(Master High Availability)目前在MySQL高可用方面是一个相对成熟的解决方案,由日本DeNA公司youshimaton(现就职于Facebook公司)开发,是一套优秀的作为MySQL高可用性环境下故障切换和主从提升的高可用软件。
在MySQL故障切换过程中,MHA能做到在0~30秒之内自动完成数据库的故障切换操作,并且在进行故障切换的过程中,MHA能在最大程度上保证数据的一致 性,以达到真正意义上的高可用。
组件介绍
MHA是构建MySQL高可用架构的一种选择方案
该软件由两部分组成:MHA Manager(管理节点)和MHA Node(数据节点)。
MHA Manager
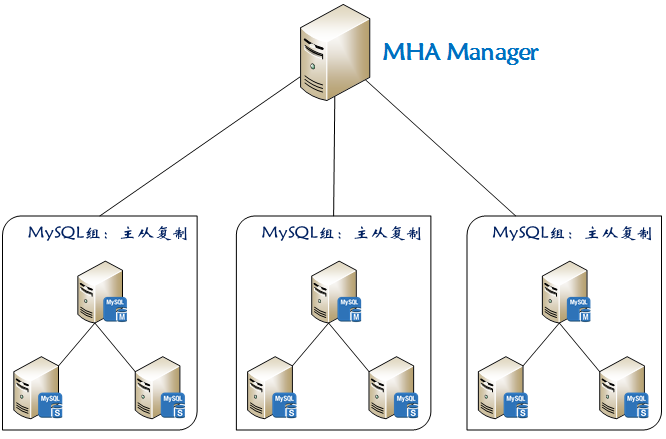
MHA Manager可以单独部署在一台独立的机器上管理多个master-slave集群,也可以部署在一台slave节点上。MHA Node运行在每台MySQL服务器上,MHA Manager会定时探测集群中的master节点,当master出现故障时,它可以自动将最新数据的slave提升为新的master,然后将所有其他的slave重新指向新的master。
MHA Node
MHA Node 部署在所有运行MySQL的服务器上,无论是master还是slave。主要作用有三个。
- 保存二进制日志
如果能够访问故障master,会拷贝master的二进制日志
- 应用差异中继日志
从拥有最新数据的slave上生成差异中继日志,然后应用差异日志。
- 清除中继日志
在不停止SQL线程的情况下删除中继日志
为了尽可能的减少主库硬件损坏宕机造成的数据丢失,因此在配置MHA的同时建议配置成MySQL半同步复制
故障转移过程
在MHA自动故障切换过程中,MHA试图从宕机的主服务器上最大限度的保存二进制日志,最大程度的保证数据的不丢失,但这并不总是可行的。例如,主服务器硬件故障或无法通过ssh访问,MHA没法保存二进制日志,只进行故障转移而丢失了最新的数据。
MHA工作原理
当master出现故障时,通过对比slave之间I/O线程读取masterbinlog的位置,选取最接近的slave做为latestslave。 其它slave通过与latest slave对比生成差异中继日志。在latest slave上应用从master保存的binlog,同时将latest slave提升为master。最后在其它slave上应用相应的差异中继日志并开始从新的master开始复制。
(1)从宕机崩溃的master保存二进制日志事件(binlog events);
(2)识别最新更新的slave;
(3)应用差异的中继日志(relay log) 到其他slave;
(4)应用从master保存的二进制日志事件(binlog events);
(5)提升一个slave为新master;
(6)使用其他的slave连接新的master进行复制。
使用MySQL 5.5开始找支持的半同步复制,可以大大降低数据丢失的风险。MHA可以与半同步复制结合起来。如果只有一个slave已经收到了最新的二进制日志,MHA可以将最新的二进制日志应用于其他所有的slave服务器上,因此可以保证所有节点的数据一致性。
MHA 工具介绍
MHA软件由两部分组成,Manager工具包和Node工具包,具体的说明如下:
Manager工具包主要包括以下几个工具
- masterha_check_ssh 检查MHA的SSH配置状况
- masterha_check_repl 检查MySQL复制状况
- masterha_manger 启动MHA
- masterha_check_status 检测当前MHA运行状态
- masterha_master_monitor 检测master是否宕机
- masterha_master_switch 控制故障转移(自动或者手动)
- masterha_conf_host 添加或删除配置的server信息
Node工具包包括以下几个该工具
- save_binary_logs 保存和复制master的二进制日志
- apply_diff_relay_logs 识别差异的中继日志事件并将其差异的事件应用于其他的slave
- filter_mysqlbinlog 去除不必要的ROLLBACK事件(MHA已不再使用这个工具)
- purge_relay_logs 清除中继日志(不会阻塞SQL线程)
另有如下几个脚本需自定义:
- master_ip_failover:管理VIP
- master_ip_online_change:
- masterha_secondary_check:当MHA manager检测到master不可用时,通过masterha_secondary_check脚本来进一步确认,减低误切的风险。
- send_report:当发生故障切换时,可通过send_report脚本发送告警信息。
MHA架构
目前MHA主要支持一主多从的架构,要搭建MHA,要求一个复制集群中必须最少有三台数据库服务器 ,一主二从,即一台master,一台充当备用master,另外一台充当从库,因为至少需要三台服务器。

MHA 实践
角色规划
| 角色 |
ip地址 |
主机名 |
server_id |
类型 |
| Master |
172.28.81.2 |
mha01 |
2 |
写入 |
| Candicate master |
172.28.81.3 |
mha02 |
3 |
读 |
| Slave/Manager |
172.28.81.4 |
mha03 |
4 |
读 |
基础环境配置
关闭防火请和selinux
1
2
3
4
|
setenforce 0
sed -i 's/SELINUX=enforcing/SELINUX=disabled/' /etc/selinux/config
systemctl disable firewalld
systemctl stop firewalld
|
配置阿里云源和epel源
 1
 2
 3
 4
 5
 6
 7
 8
 9
10
11
12
13
14
15
16
17
18
19
20
21
22
23
24
25
26
27
28
29
30
|
# 配置阿里云镜像源
wget -O /etc/yum.repos.d/CentOS-Base.repo http://mirrors.aliyun.com/repo/Centos-7.repo
# 配置epel源
cat<<'EOF'>/etc/yum.repos.d/epel.repo
[epel]
name=Extra Packages for Enterprise Linux 7 - $basearch
baseurl=http://mirrors.aliyun.com/epel/7/$basearch
failovermethod=priority
enabled=1
gpgcheck=0
gpgkey=file:///etc/pki/rpm-gpg/RPM-GPG-KEY-EPEL-7

[epel-debuginfo]
name=Extra Packages for Enterprise Linux 7 - $basearch - Debug
baseurl=http://mirrors.aliyun.com/epel/7/$basearch/debug
failovermethod=priority
enabled=0
gpgkey=file:///etc/pki/rpm-gpg/RPM-GPG-KEY-EPEL-7
gpgcheck=0

[epel-source]
name=Extra Packages for Enterprise Linux 7 - $basearch - Source
baseurl=http://mirrors.aliyun.com/epel/7/SRPMS
failovermethod=priority
enabled=0
gpgkey=file:///etc/pki/rpm-gpg/RPM-GPG-KEY-EPEL-7
gpgcheck=0
EOF
# 安装epel源
yum install -y epel-release
|
配置时间同步
1
2
3
|
yum install ntpdate -y
ntpdate ntp4.aliyun.com
echo "*/5 * * * * /usr/sbin/ntpdate ntp4.aliyun.com 1>/dev/null 2>&1">>/var/spool/cron/root
|
Mysql 实例安装(master,slave,slave)
三台机器全部安装Mysql实例,版本为5.7最新版本,一主两从的架构
下载
1
2
3
4
5
6
7
8
9
|
# 安装
wget https://cdn.mysql.com//Downloads/MySQL-5.7/mysql-5.7.37-linux-glibc2.12-x86_64.tar.gz -P /usr/local/src
tar zxf /usr/local/src/mysql-5.7.37-linux-glibc2.12-x86_64.tar.gz -C /usr/local/src
mv /usr/local/src/mysql-5.7.37-linux-glibc2.12-x86_64 /usr/local/mysql
# 配置环境变量
echo "export PATH=$PATH:/usr/local/mysql/bin" >> /etc/profile
source /etc/profile
# 安装依赖
yum install -y libaio
|
创建mysql系统用户
1
2
|
groupadd mysql
useradd -r -g mysql -s /bin/false mysql
|
创建数据目录
1
2
3
|
mkdir -p /data/mysql3306/{mysql,binlog,slowlog,tmp,log,run,conf}
chown -R mysql:mysql /data/mysql3306
chown -R mysql:mysql /usr/local/mysql
|
创建配置文件
自定义配置文件,mysql配置文件如下所示(/data/mysql3306/conf/my.cnf),需要注意的是两个库一定要限制为只读,因为在后面MHA随时会将从库提升为主库:
  1
  2
  3
  4
  5
  6
  7
  8
  9
 10
 11
 12
 13
 14
 15
 16
 17
 18
 19
 20
 21
 22
 23
 24
 25
 26
 27
 28
 29
 30
 31
 32
 33
 34
 35
 36
 37
 38
 39
 40
 41
 42
 43
 44
 45
 46
 47
 48
 49
 50
 51
 52
 53
 54
 55
 56
 57
 58
 59
 60
 61
 62
 63
 64
 65
 66
 67
 68
 69
 70
 71
 72
 73
 74
 75
 76
 77
 78
 79
 80
 81
 82
 83
 84
 85
 86
 87
 88
 89
 90
 91
 92
 93
 94
 95
 96
 97
 98
 99
100
101
102
103
104
105
106
107
108
109
110
111
112
113
114
115
116
117
118
119
120
121
122
123
124
125
126
127
128
129
130
131
132
133
134
135
136
137
138
139
140
141
142
143
144
145
146
147
148
149
150
151
152
153
154
155
156
157
158
159
160
161
162
163
164
165
166
167
168
169
170
171
172
173
174
175
176
177
178
179
|
[client]
port            = 3306
socket          =/data/mysql3306/run/mysql.sock

[mysql]
prompt="\u@node01\R:\m:\s [\d]> "   #  XXXX主机名
no-auto-rehash
socket=/data/mysql3306/run/mysql.sock

[mysqld]
####: for global
user                                =mysql                          #	mysql
basedir                             =/usr/local/mysql/              #	/usr/local/mysql/
datadir                             =/data/mysql3306/mysql    #	/usr/local/mysql/data
server_id                           =1                       #	0
socket                              =/data/mysql3306/run/mysql.sock
pid-file                            =/data/mysql3306/run/mysq.pid
port                                =3306                          #	3375
character_set_server                =utf8mb4                           #	latin1
explicit_defaults_for_timestamp     =off                            #    off
log_timestamps                      =system                         #	utc
#read_only                           =0                              #	off
skip_name_resolve                   =1                              #   0
max_allowed_packet = 32M
lower_case_table_names              =1                              #	0
secure_file_priv                    =                               #	null
open_files_limit                    =65536                          #   1024
thread_stack = 512K
external-locking = FALSE
max_allowed_packet = 32M
sort_buffer_size = 4M
join_buffer_size = 4M
thread_cache_size = 768
max_connections                     =2000                           #   151
thread_cache_size                   =64                             #   9
table_open_cache                    =81920                          #   2000
table_definition_cache              =4096                           #   1400
table_open_cache_instances          =64                             #   16
max_prepared_stmt_count             =1048576                        #

####: for binlog
binlog_format                       =row                          #	row
log-bin                             =/data/mysql3306/binlog/mysql-bin
log-bin-index                       =/data/mysql3306/binlog/mysql-bin.index                      #	off
binlog_rows_query_log_events        =on                             #	off
log_slave_updates                   =on                             #	off
expire_logs_days                    =7                              #	0
binlog_cache_size                   =65536                          #	65536(64k)
#binlog_checksum                    =none                           #	CRC32
sync_binlog                         =0                              #	1
slave-preserve-commit-order         =ON                             #

####: for relaylog
relay_log = /data/mysql3306/binlog/mysql-relay-bin


####: for error-log
log_error                           =/data/mysql3306/log/error.log                        #	/usr/local/mysql/data/localhost.localdomain.err

general_log                         =off                            #   off
general_log_file                    =/data/mysql3306/log/general.log                    #   hostname.log

####: for slow query log
slow_query_log                      =on                             #    off
slow_query_log_file                 =/data/mysql3306/slowlog/slow.log                       #    hostname.log
log_queries_not_using_indexes       =on                             #    off
long_query_time                     =5                       #    10.000000
log_throttle_queries_not_using_indexes = 60
min_examined_row_limit = 100
log_slow_admin_statements = 1
log_slow_slave_statements = 1
####: for gtid
gtid_mode                           =on                            #	off
enforce_gtid_consistency            =on                            #	off


####: for replication
skip_slave_start                    =1                              #
master_info_repository              =table                         #	file
relay_log_info_repository           =table                         #	file
#relay_log_recovery                 =1
slave_parallel_type                 =logical_clock                 #    database | LOGICAL_CLOCK
slave_parallel_workers              =4                             #    0
rpl_semi_sync_master_enabled       =1                             #    0
rpl_semi_sync_slave_enabled        =1                             #    0
rpl_semi_sync_master_timeout       =1000                          #    1000(1 second)
plugin_load_add                    =semisync_master.so            #
plugin_load_add                    =semisync_slave.so             #
#binlog_group_commit_sync_delay     =100                           #    500(0.05%秒)、默认值0
#binlog_group_commit_sync_no_delay_count = 10                       #    0

replicate_wild_ignore_table=mysql.%
replicate_wild_ignore_table=test.%
replicate_wild_ignore_table=information_schema.%

explicit_defaults_for_timestamp = 1
innodb_thread_concurrency = 0
innodb_sync_spin_loops = 100
innodb_spin_wait_delay = 30

transaction_isolation = REPEATABLE-READ
#innodb_additional_mem_pool_size = 16M
innodb_buffer_pool_size = 2000M
innodb_buffer_pool_instances = 4
innodb_buffer_pool_load_at_startup = 1
innodb_buffer_pool_dump_at_shutdown = 1
innodb_data_file_path = ibdata1:1G:autoextend
innodb_flush_log_at_trx_commit = 1
innodb_log_buffer_size = 32M
innodb_log_file_size = 2G
innodb_log_files_in_group = 2
innodb_max_undo_log_size = 4G
innodb_undo_directory = /data/mysql3306/undolog
innodb_undo_tablespaces = 95

# 根据您的服务器IOPS能力适当调整
# 一般配普通SSD盘的话,可以调整到 10000 - 20000
# 配置高端PCIe SSD卡的话,则可以调整的更高,比如 50000 - 80000
innodb_io_capacity = 4000
innodb_io_capacity_max = 8000
innodb_flush_neighbors = 0
innodb_write_io_threads = 8
innodb_read_io_threads = 8
innodb_purge_threads = 4
innodb_page_cleaners = 4
innodb_open_files = 65535
innodb_max_dirty_pages_pct = 50
innodb_flush_method = O_DIRECT
innodb_lru_scan_depth = 4000
innodb_checksum_algorithm = crc32
innodb_lock_wait_timeout = 10
innodb_rollback_on_timeout = 1
innodb_print_all_deadlocks = 1
innodb_file_per_table = 1
innodb_online_alter_log_max_size = 4G
internal_tmp_disk_storage_engine = InnoDB
innodb_stats_on_metadata = 0

# some var for MySQL 5.7
innodb_checksums = 1
#innodb_file_format = Barracuda
#innodb_file_format_max = Barracuda
query_cache_size = 0
query_cache_type = 0
innodb_undo_logs = 128

innodb_status_file = 1
# 注意: 开启 innodb_status_output & innodb_status_output_locks 后, 可能会导致log-error文件增长较快
innodb_status_output = 0
innodb_status_output_locks = 0
key_buffer_size = 32M
read_buffer_size = 8M
read_rnd_buffer_size = 4M
bulk_insert_buffer_size = 64M
lock_wait_timeout = 3600

#performance_schema
performance_schema = 1
performance_schema_instrument = '%=on'

#innodb monitor
innodb_monitor_enable="module_innodb"
innodb_monitor_enable="module_server"
innodb_monitor_enable="module_dml"
innodb_monitor_enable="module_ddl"
innodb_monitor_enable="module_trx"
innodb_monitor_enable="module_os"
innodb_monitor_enable="module_purge"
innodb_monitor_enable="module_log"
innodb_monitor_enable="module_lock"
innodb_monitor_enable="module_buffer"
innodb_monitor_enable="module_index"
innodb_monitor_enable="module_ibuf_system"
innodb_monitor_enable="module_buffer_page"
innodb_monitor_enable="module_adaptive_hash"

[mysqldump]
quick
max_allowed_packet = 32M
|
配置自动启动system文件
创建systemd自动启动文件,方便维护,自启动配置文件如下(mysqld.service),创建完成后,放到/usr/lib/systemd/system/目录下:
 1
 2
 3
 4
 5
 6
 7
 8
 9
10
11
12
13
14
15
16
17
18
19
20
21
22
23
24
25
26
27
28
29
30
31
32
33
34
35
36
37
38
39
40
41
42
43
44
45
46
47
48
49
50
51
52
53
54
55
56
57
58
59
60
61
|
# Copyright (c) 2015, 2016, Oracle and/or its affiliates. All rights reserved.
#
# This program is free software; you can redistribute it and/or modify
# it under the terms of the GNU General Public License as published by
# the Free Software Foundation; version 2 of the License.
#
# This program is distributed in the hope that it will be useful,
# but WITHOUT ANY WARRANTY; without even the implied warranty of
# MERCHANTABILITY or FITNESS FOR A PARTICULAR PURPOSE.  See the
# GNU General Public License for more details.
#
# You should have received a copy of the GNU General Public License
# along with this program; if not, write to the Free Software
# Foundation, Inc., 51 Franklin St, Fifth Floor, Boston, MA  02110-1301 USA
#
# systemd service file for MySQL forking server
#

[Unit]
Description=MySQL Server
Documentation=man:mysqld(7)
Documentation=http://dev.mysql.com/doc/refman/en/using-systemd.html
After=network.target
After=syslog.target

[Install]
WantedBy=multi-user.target

[Service]
User=mysql
Group=mysql

Type=forking
#Type=sample

#PIDFile=/data/mysql3306/run/mysqld.pid

# Disable service start and stop timeout logic of systemd for mysqld service.
TimeoutSec=0

# Execute pre and post scripts as root
PermissionsStartOnly=true

# Needed to create system tables
#ExecStartPre=/usr/bin/mysqld_pre_systemd

# Start main service
#ExecStart=/usr/local/mysql/bin/mysqld --daemonize --pid-file=/data/mysql3306/run/mysqld.pid $MYSQLD_OPTS
ExecStart=/usr/local/mysql/bin/mysqld --defaults-file=/data/mysql3306/conf/my.cnf --daemonize

# Use this to switch malloc implementation
EnvironmentFile=-/etc/sysconfig/mysql

# Sets open_files_limit
LimitNOFILE = 65535

Restart=on-failure

RestartPreventExitStatus=1

PrivateTmp=false
|
初始化mysql
1
2
3
4
|
# 初始化
mysqld --defaults-file=/data/mysql3306/conf/my.cnf --initialize --user=mysql --basedir=/usr/local/mysql --datadir=/data/mysql3306/mysql
# 配置ssl
mysql_ssl_rsa_setup --basedir=/usr/local/mysql --datadir=/data/mysql3306/mysql
|
启动Mysql实例
1
2
3
4
5
6
7
|
systemctl enable mysqld
systemctl start mysqld
# 配置密码
mysqladmin -S /data/mysql3306/run/mysql.sock -uroot password 'o6vTAkyDLqAyVyuA3W9J' -p'r*tig_;fu5%A'
# 修改root远程登陆
mysql> update mysql.user set Host='172.28.81.%' where User='root';
mysql> flush privileges;
|
Mysql 复制配置(master,slave,slave)
三个库上创建复制用户,mha管理用户
1
2
3
4
5
6
|
mysql -h172.28.81.2 -uroot -p'o6vTAkyDLqAyVyuA3W9J'
create user 'repl'@'172.28.81.%' identified by 'NlfG53idFgykMrlw1w4d';
create user 'mha'@'172.28.81.%' identified by 'NlfG53idFgykMrlw1w4d';
grant replication slave,replication client,super on *.* to 'repl'@'172.28.81.%';
grant all privileges on *.* to 'mha'@'172.28.81.%';
flush privileges;
|
主库导出数据(新搭建集群可忽略)
1
|
mysqldump --single-transaction -uroot -proot123 --opt --master-data=2 --flush-logs --events --triggers --routines -A > all.sql
|
从库导入数据
1
2
3
4
|
# 清空gtid_executed
reset master
# 导入数据
mysql -uroot -p < all.sql
|
在master查看状态

两个从库配置只读
1
|
set global read_only=1;
|
两个从库配置主从
1
2
3
4
5
6
7
8
9
|
# 配置主从
CHANGE MASTER TO
MASTER_HOST='172.28.81.2',
MASTER_USER='repl',
MASTER_PASSWORD='NlfG53idFgykMrlw1w4d',
MASTER_PORT=3306,
MASTER_AUTO_POSITION = 1;
# 开启主从
start slave
|
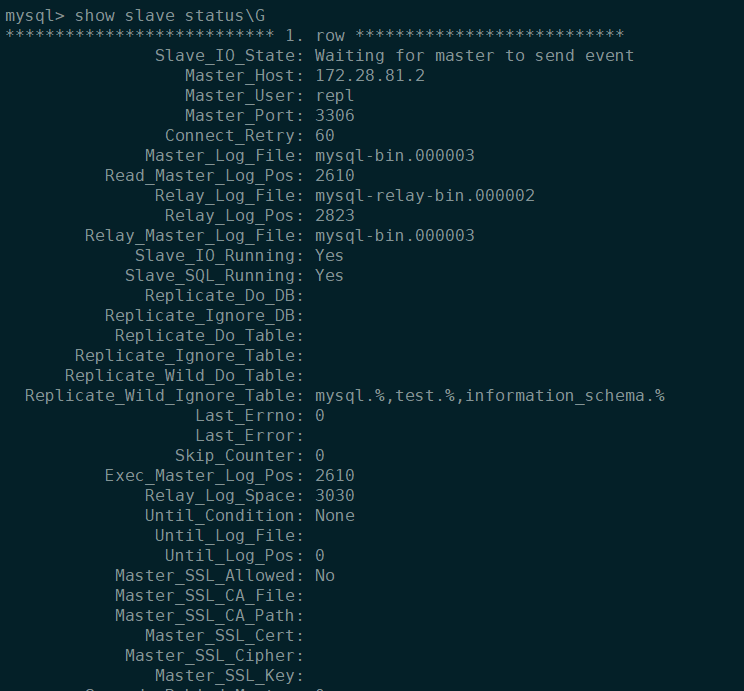
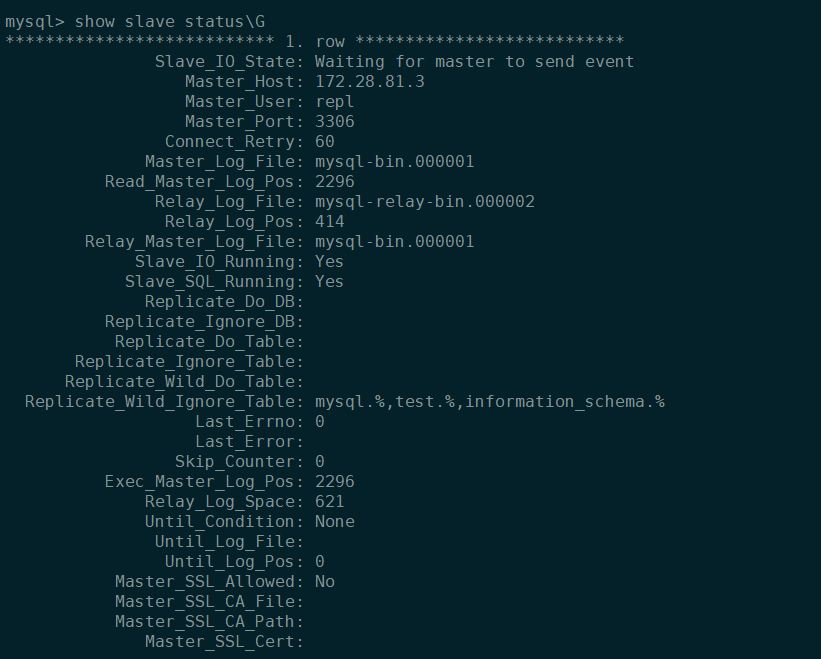
检查主库从库主从状态

测试
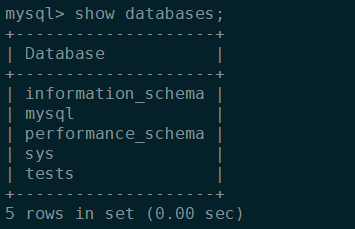
主库上创建数据s
1
|
create database tests DEFAULT CHARACTER SET utf8mb4;
|
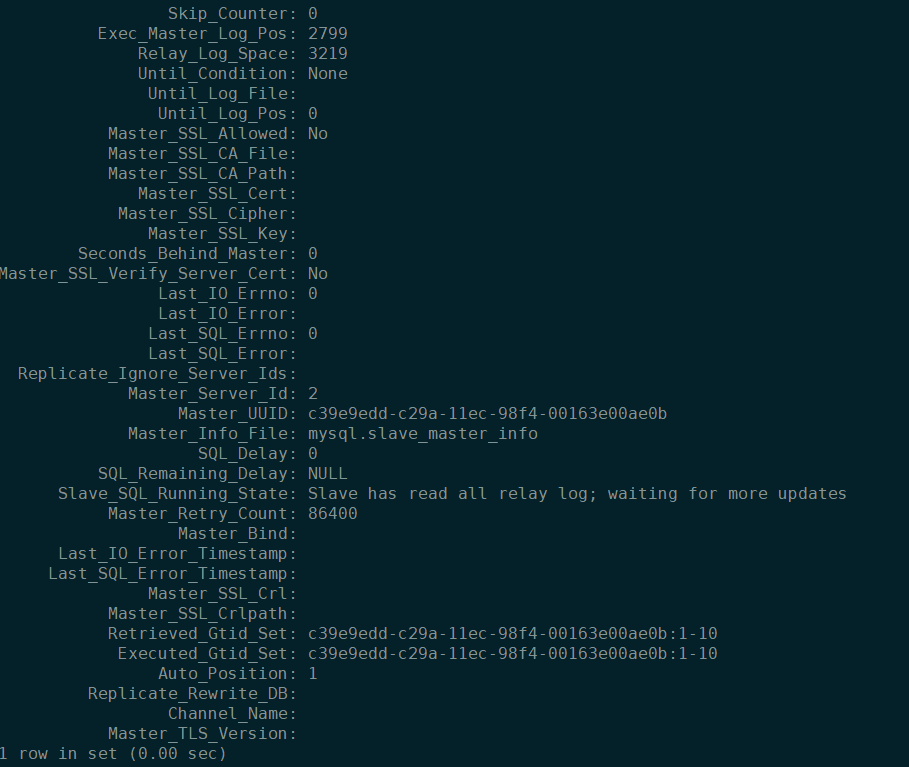
从库上查看,发现数据已经同步过来,再次查看主从状态,发现已经同步更新


到这里,整个Mysql一主两从高可用集群架构已经搭建完毕,剩下即为MHA搭建配置
部署 MHA软件
配置免密登陆
1
2
3
4
5
6
7
|
ssh-keygen -t rsa  -f /root/.ssh/id_rsa -P ''
ssh-copy-id 172.28.81.2
ssh-copy-id 172.28.81.3
ssh-copy-id 172.28.81.4

scp -r  /root/.ssh/ 172.28.81.3:/root/
scp -r  /root/.ssh/ 172.28.81.4:/root/
|
安装依赖(三个节点)
1
2
|
yum install perl-DBD-MySQL -y
yum install -y perl-Module-Install
|
安装MHA Node(三个节点)
1、下载安装包
1
|
wget https://github.com/yoshinorim/mha4mysql-node/releases/download/v0.58/mha4mysql-node-0.58.tar.gz -P /usr/local/src
|
2、编译安装
1
2
3
4
|
tar zxvf /usr/local/src/mha4mysql-node-0.58.tar.gz -C /usr/local/
cd /usr/local/mha4mysql-node-0.58
perl Makefile.PL
make && make install
|
安装MHA Manager(仅在Manger管理结点安装)
1、下载安装包
1
|
wget https://github.com/yoshinorim/mha4mysql-manager/releases/download/v0.58/mha4mysql-manager-0.58.tar.gz -P /usr/local/src
|
2、编译安装
1
2
3
4
5
6
|
tar zxvf /usr/local/src/mha4mysql-manager-0.58.tar.gz -C /usr/local/
cd /usr/local/mha4mysql-manager-0.58
perl Makefile.PL
make && make install
yum install mailx -y
yum install perl-DBD-MySQL perl-Config-Tiny perl-Log-Dispatch perl-Parallel-ForkManager  perl-Time-HiRes perl-ExtUtils-CBuilder perl-ExtUtils-MakeMaker -y
|
配置MHA
创建目录
1
|
mkdir -pv /etc/mha/scripts
|
配置主配置文件
在/etc/mha目录下创建主配置文件(/etc/mha/app1.conf)
 1
 2
 3
 4
 5
 6
 7
 8
 9
10
11
12
13
14
15
16
17
18
19
20
21
22
23
24
25
26
27
28
29
30
31
32
33
34
35
36
37
38
39
40
41
|
[server default]
manager_workdir=/var/log/mha/app1
manager_log=/var/log/mha/app1/manager.log
# mha管理用户
user=mha
# mha管理密码
password=NlfG53idFgykMrlw1w4d
#基于ssh的密钥认证
ssh_user=root
#数据库用户名
repl_user=repl
#数据库密码
repl_password=NlfG53idFgykMrlw1w4d
# ping间隔时长
ping_interval=1
master_binlog_dir=/data/mysql3306/binlog
secondary_check_script=masterha_secondary_check -s 172.28.81.2 -s 172.28.81.3 -s 172.28.81.4
# 自动切换时vip管理的脚本
master_ip_failover_script="/etc/mha/scripts/master_ip_failover"
# 在线切换时vip的管理脚本
master_ip_online_change_script="/etc/mha/scripts/master_ip_online_change"
# 因故障切换后发送报警的脚本
report_script="/etc/mha/scripts/send_report"

[server1]
hostname=172.28.81.2
# master候选节点
candidate_master=1
master_binlog_dir="/data/mysql3306/binlog"
#查看方式 find / -name mysql-bin*

[server2]
hostname=172.28.81.3
candidate_master=1
master_binlog_dir="/data/mysql3306/binlog"

[server3]
hostname=172.28.81.4
master_binlog_dir="/data/mysql3306/binlog"
#表示没有机会成为master
no_master=1
|
薪增自动切换脚本
在/etc/mha/scripts目录下创建自动切换脚本(/etc/mha/scripts/master_ip_failover)
 1
 2
 3
 4
 5
 6
 7
 8
 9
10
11
12
13
14
15
16
17
18
19
20
21
22
23
24
25
26
27
28
29
30
31
32
33
34
35
36
37
38
39
40
41
42
43
44
45
46
47
48
49
50
51
52
53
54
55
56
57
58
59
60
61
62
63
64
65
66
67
68
69
70
71
72
73
74
75
76
77
78
79
80
81
|
#!/usr/bin/env perl
use strict;
use warnings FATAL => 'all';
use Getopt::Long;

my (
$command,   $ssh_user,  $orig_master_host,
$orig_master_ip,$orig_master_port, $new_master_host, $new_master_ip,$new_master_port
);

######## 定义VIP变量 , 需要修改其中的vip 和 网口名称  ########
my $vip = '172.28.81.100/20';
my $key = '1';
my $ssh_start_vip = "/sbin/ifconfig eth0:$key $vip";
my $ssh_stop_vip = "/sbin/ifconfig eth0:$key down";

GetOptions(
'command=s'     => \$command,
'ssh_user=s'        => \$ssh_user,
'orig_master_host=s'    => \$orig_master_host,
'orig_master_ip=s'  => \$orig_master_ip,
'orig_master_port=i'    => \$orig_master_port,
'new_master_host=s' => \$new_master_host,
'new_master_ip=s'   => \$new_master_ip,
'new_master_port=i' => \$new_master_port,
);

exit &main();

sub main {
print "\n\nIN SCRIPT TEST====$ssh_stop_vip==$ssh_start_vip===\n\n";
if ( $command eq "stop" || $command eq "stopssh" ) {
    my $exit_code = 1;
    eval {
        print "Disabling the VIP on old master: $orig_master_host \n";
        &stop_vip();
        $exit_code = 0;
    };
    if ($@) {
        warn "Got Error: $@\n";
        exit $exit_code;
    }
    exit $exit_code;
}

elsif ( $command eq "start" ) {
my $exit_code = 10;
eval {
    print "Enabling the VIP - $vip on the new master - $new_master_host \n";
    &start_vip();
    $exit_code = 0;
};

if ($@) {
    warn $@;
    exit $exit_code;
    }
exit $exit_code;
}

elsif ( $command eq "status" ) {
    print "Checking the Status of the script.. OK \n";
    exit 0;
}
else {
    &usage();
    exit 1;
}
}

sub start_vip() {
`ssh $ssh_user\@$new_master_host \" $ssh_start_vip \"`;
}
sub stop_vip() {
return 0 unless ($ssh_user);
`ssh $ssh_user\@$orig_master_host \" $ssh_stop_vip \"`;
}
sub usage {
print
"Usage: master_ip_failover --command=start|stop|stopssh|status --orig_master_host=host --orig_master_ip=ip --orig_master_port=port --new_master_host=host --new_master_ip=ip --new_master_port=port\n";
}
|
薪增邮件报警脚本
在/etc/mha/scripts目录下创建邮件报警脚本(/etc/mha/scripts/send_report)
 1
 2
 3
 4
 5
 6
 7
 8
 9
10
11
12
13
14
15
16
17
18
19
20
21
22
23
24
25
26
27
28
29
30
31
|
# mail邮件发送程序,需要先配置好发送这信息
vim /etc/mail.rc
set from=plyx_46204@126.com
set smtp=smtps://smtp.126.com:465
set smtp-auth-user=plyx_46204@126.com
set smtp-auth-password=xxxxxxx
set smtp-auth=login
set nss-config-dir=/etc/pki/nssdb
set ssl-verify=ignore

# 这是具体的邮件发送脚本
vim /etc/mha/scripts/send_report
#!/bin/bash
source /root/.bash_profile
# 解析变量
orig_master_host=`echo "$1" | awk -F = '{print $2}'`
new_master_host=`echo "$2" | awk -F = '{print $2}'`
new_slave_hosts=`echo "$3" | awk -F = '{print $2}'`
subject=`echo "$4" | awk -F = '{print $2}'`
body=`echo "$5" | awk -F = '{print $2}'`
########定义收件人地址########
email="plyx_46204@126.com"

tac /var/log/mha/app1/manager.log | sed -n 2p | grep 'successfully' > /dev/null
if [ $? -eq 0 ];then
    messages=`echo -e "MHA $subject 主从切换成功\n master:$orig_master_host --> $new_master_host \n $body \n 当前从库:$new_slave_hosts"`
    echo "$messages" | mail -s "Mysql 实例宕掉,MHA $subject 切换成功" $email >>/tmp/mailx.log 2>&1
else
    messages=`echo -e "MHA $subject 主从切换失败\n master:$orig_master_host --> $new_master_host \n $body" `
    echo "$messages" | mail -s ""Mysql 实例宕掉,MHA $subject 切换失败"" $email >>/tmp/mailx.log 2>&1
fi
|
薪增在线切换master脚本
在/etc/mha/scripts目录下在线切换master脚本(/etc/mha/scripts/master_ip_online_change)
 1
 2
 3
 4
 5
 6
 7
 8
 9
10
11
12
13
14
15
16
17
18
19
20
21
22
23
24
25
26
27
28
29
30
31
32
33
34
35
36
37
38
39
40
41
42
43
|
#!/bin/bash
source /root/.bash_profile

vip=`echo '172.28.81.100/20'`  #######设置VIP#####
key=`echo '1'`

command=`echo "$1" | awk -F = '{print $2}'`
orig_master_host=`echo "$2" | awk -F = '{print $2}'`
new_master_host=`echo "$7" | awk -F = '{print $2}'`
orig_master_ssh_user=`echo "${12}" | awk -F = '{print $2}'`
new_master_ssh_user=`echo "${13}" | awk -F = '{print $2}'`

#######要求服务的网卡识别名一样,都为ens32(这里是) #######
stop_vip=`echo "ssh root@$orig_master_host /usr/sbin/ifconfig eth0:$key down"`
start_vip=`echo "ssh root@$new_master_host /usr/sbin/ifconfig eth0:$key $vip"`

if [ $command = 'stop' ];then
    echo -e "\n\n\n****************************\n"
    echo -e "Disabled thi VIP - $vip on old master: $orig_master_host \n"
    $stop_vip

    if [ $? -eq 0 ];then
        echo "Disabled the VIP successfully"
    else
        echo "Disabled the VIP failed"
    fi

    echo -e "***************************\n\n\n"
fi

if [ $command = 'start' -o $command = 'status' ];then
    echo -e "\n\n\n*************************\n"
    echo -e "Enabling the VIP - $vip on new master: $new_master_host \n"
    $start_vip

    if [ $? -eq 0 ];then
        echo "Enabled the VIP successfully"
    else
        echo "Enabled the VIP failed"
    fi

    echo -e "***************************\n\n\n"
fi
|
脚本添加可执行权限
1
|
chmod +x /etc/mha/scripts/*
|
验证ssh登陆
 1
 2
 3
 4
 5
 6
 7
 8
 9
10
11
12
13
14
15
16
|
masterha_check_ssh --conf=/etc/mha/app1.cnf
Sat Apr 23 10:21:09 2022 - [debug]  Connecting via SSH from root@172.28.81.2(172.28.81.2:22) to root@172.28.81.3(172.28.81.3:22)..
Sat Apr 23 10:21:10 2022 - [debug]   ok.
Sat Apr 23 10:21:10 2022 - [debug]  Connecting via SSH from root@172.28.81.2(172.28.81.2:22) to root@172.28.81.4(172.28.81.4:22)..
Sat Apr 23 10:21:10 2022 - [debug]   ok.
Sat Apr 23 10:21:11 2022 - [debug]
Sat Apr 23 10:21:10 2022 - [debug]  Connecting via SSH from root@172.28.81.3(172.28.81.3:22) to root@172.28.81.2(172.28.81.2:22)..
Sat Apr 23 10:21:10 2022 - [debug]   ok.
Sat Apr 23 10:21:10 2022 - [debug]  Connecting via SSH from root@172.28.81.3(172.28.81.3:22) to root@172.28.81.4(172.28.81.4:22)..
Sat Apr 23 10:21:10 2022 - [debug]   ok.
Sat Apr 23 10:21:12 2022 - [debug]
Sat Apr 23 10:21:10 2022 - [debug]  Connecting via SSH from root@172.28.81.4(172.28.81.4:22) to root@172.28.81.2(172.28.81.2:22)..
Sat Apr 23 10:21:11 2022 - [debug]   ok.
Sat Apr 23 10:21:11 2022 - [debug]  Connecting via SSH from root@172.28.81.4(172.28.81.4:22) to root@172.28.81.3(172.28.81.3:22)..
Sat Apr 23 10:21:11 2022 - [debug]   ok.
Sat Apr 23 10:21:12 2022 - [info] All SSH connection tests passed successfully.
|
验证主从是否成功
1
2
3
4
5
6
7
8
9
|
masterha_check_repl --conf=/etc/mha/app1.cnf
IN SCRIPT TEST====/sbin/ifconfig eth0:1 down==/sbin/ifconfig eth0:1 172.28.81.100/24===

Checking the Status of the script.. OK
Sat Apr 23 10:33:59 2022 - [info]  OK.
Sat Apr 23 10:33:59 2022 - [warning] shutdown_script is not defined.
Sat Apr 23 10:33:59 2022 - [info] Got exit code 0 (Not master dead).

MySQL Replication Health is OK.
|
启动MHA
绑定VIP
1
|
/sbin/ifconfig eth0:1 172.28.81.100/20
|
启动MHA
1
2
3
4
5
6
7
8
|
mkdir /var/log/mha/app1 -p
touch /var/log/mha/app1/manager.log
nohup masterha_manager --conf=/etc/mha/app1.cnf --remove_dead_master_conf --ignore_last_failover < /dev/null > /var/log/mha/app1/manager.log 2>&1 &
Sat Apr 23 11:55:43 2022 - [warning] shutdown_script is not defined.
Sat Apr 23 11:55:43 2022 - [info] Set master ping interval 1 seconds.
Sat Apr 23 11:55:43 2022 - [info] Set secondary check script: masterha_secondary_check -s 172.28.81.2 -s 172.28.81.3 -s 172.28.81.4
Sat Apr 23 11:55:43 2022 - [info] Starting ping health check on 172.28.81.2(172.28.81.2:3306)..
Sat Apr 23 11:55:43 2022 - [info] Ping(SELECT) succeeded, waiting until MySQL doesn't respond..
|
检查集群状态
1
2
3
|
masterha_check_status --conf=/etc/mha/app1.cnf
[root@mha03 mha4mysql-manager-0.58]# masterha_check_status --conf=/etc/mha/app1.cnf
app1 (pid:13740) is running(0:PING_OK), master:172.28.81.2
|
自动切换测试
停止主库mysqld服务
在manager中查看日志
172.28.81.3成功成为master,172.28.81.2成为172.28.81.3的slave
 1
 2
 3
 4
 5
 6
 7
 8
 9
10
11
12
13
14
15
16
|
app1: MySQL Master failover 172.28.81.2(172.28.81.2:3306) to 172.28.81.3(172.28.81.3:3306) succeeded

Master 172.28.81.2(172.28.81.2:3306) is down!

Check MHA Manager logs at mha03:/var/log/mha/app1/manager.log for details.

Started automated(non-interactive) failover.
Invalidated master IP address on 172.28.81.2(172.28.81.2:3306)
Selected 172.28.81.3(172.28.81.3:3306) as a new master.
172.28.81.3(172.28.81.3:3306): OK: Applying all logs succeeded.
172.28.81.3(172.28.81.3:3306): OK: Activated master IP address.
172.28.81.4(172.28.81.4:3306): OK: Slave started, replicating from 172.28.81.3(172.28.81.3:3306)
172.28.81.3(172.28.81.3:3306): Resetting slave info succeeded.
Master failover to 172.28.81.3(172.28.81.3:3306) completed successfully.
Sat Apr 23 12:13:47 2022 - [info] Sending mail..
|

查看主从信息
在slave中查看主从信息,master指向了Candicate master,并且vip也指向了Candicate master


注意:(实验测试当物理故障时,没有指定shutdown_script是没用的,不切换)
修复老的master,指向新的master
1、修改manager配置文件(只针在线切换的,自动切换不会删除配置)
1
2
3
4
5
|
将如下内容添加到/etc/mha/app1.conf 中
[server1]
candidate_master=1
hostname=172.28.81.2
master_binlog_dir="/data/mysql3306/binlog"
|
2、修改老的master,然后设置为slave
 1
 2
 3
 4
 5
 6
 7
 8
 9
10
|
systemctl restart mysqld
reset master;
CHANGE MASTER TO
MASTER_HOST='172.28.81.3',
MASTER_USER='repl',
MASTER_PASSWORD='NlfG53idFgykMrlw1w4d',
MASTER_PORT=3306,
MASTER_AUTO_POSITION = 1;
start slave;
set global read_only=1;
|
3、在master结点上重启监控进程
 1
 2
 3
 4
 5
 6
 7
 8
 9
10
11
12
13
14
15
|
# 三个结点都执行
ln -sf /usr/local/mysql/bin/mysqlbinlog /usr/bin/mysqlbinlog
ln -sf /usr/local/mysql/bin/mysql /usr/bin/mysql
# 启动manager 监控进程
nohup masterha_manager --conf=/etc/mha/app1.cnf --remove_dead_master_conf --ignore_last_failover < /dev/null > /var/log/mha/app1/manager.log 2>&1 &

IN SCRIPT TEST====/sbin/ifconfig eth0:1 down==/sbin/ifconfig eth0:1 172.28.81.100/20===

Checking the Status of the script.. OK
Sat Apr 23 13:47:08 2022 - [info]  OK.
Sat Apr 23 13:47:08 2022 - [warning] shutdown_script is not defined.
Sat Apr 23 13:47:08 2022 - [info] Got exit code 0 (Not master dead).

MySQL Replication Health is OK.
|
手动切换测试
注意点:前提,mha监控没有运行的情况下,才能进行
手动切换时,mha不能运行,需要停掉mha
1
2
|
masterha_stop --conf=/etc/mha/app1.cnf
MHA Manager is not running on app1(2:NOT_RUNNING).
|
执行切换
 1
 2
 3
 4
 5
 6
 7
 8
 9
10
11
12
13
14
15
16
17
18
19
20
21
22
23
24
25
26
27
28
29
30
31
32
33
34
|
#需要填写新的master的IP
masterha_master_switch --conf=/etc/mha/app1.cnf --master_state=alive --new_master_host=172.28.81.3 --orig_master_is_new_slave --running_updates_limit=10000 --interactive=0
Sat Apr 23 13:52:35 2022 - [info]  ok.
Sat Apr 23 13:52:35 2022 - [info] Setting read_only=0 on 172.28.81.2(172.28.81.2:3306)..
Sat Apr 23 13:52:35 2022 - [info]  ok.
Sat Apr 23 13:52:35 2022 - [info]
Sat Apr 23 13:52:35 2022 - [info] * Switching slaves in parallel..
Sat Apr 23 13:52:35 2022 - [info]
Sat Apr 23 13:52:35 2022 - [info] -- Slave switch on host 172.28.81.4(172.28.81.4:3306) started, pid: 16483
Sat Apr 23 13:52:35 2022 - [info]
Sat Apr 23 13:52:36 2022 - [info] Log messages from 172.28.81.4 ...
Sat Apr 23 13:52:36 2022 - [info]
Sat Apr 23 13:52:35 2022 - [info]  Waiting to execute all relay logs on 172.28.81.4(172.28.81.4:3306)..
Sat Apr 23 13:52:35 2022 - [info]  master_pos_wait(mysql-bin.000001:2296) completed on 172.28.81.4(172.28.81.4:3306). Executed 0 events.
Sat Apr 23 13:52:35 2022 - [info]   done.
Sat Apr 23 13:52:35 2022 - [info]  Resetting slave 172.28.81.4(172.28.81.4:3306) and starting replication from the new master 172.28.81.2(172.28.81.2:3306)..
Sat Apr 23 13:52:35 2022 - [info]  Executed CHANGE MASTER.
Sat Apr 23 13:52:35 2022 - [info]  Slave started.
Sat Apr 23 13:52:36 2022 - [info] End of log messages from 172.28.81.4 ...
Sat Apr 23 13:52:36 2022 - [info]
Sat Apr 23 13:52:36 2022 - [info] -- Slave switch on host 172.28.81.4(172.28.81.4:3306) succeeded.
Sat Apr 23 13:52:36 2022 - [info] Unlocking all tables on the orig master:
Sat Apr 23 13:52:36 2022 - [info] Executing UNLOCK TABLES..
Sat Apr 23 13:52:36 2022 - [info]  ok.
Sat Apr 23 13:52:36 2022 - [info] Starting orig master as a new slave..
Sat Apr 23 13:52:36 2022 - [info]  Resetting slave 172.28.81.3(172.28.81.3:3306) and starting replication from the new master 172.28.81.2(172.28.81.2:3306)..
Sat Apr 23 13:52:36 2022 - [info]  Executed CHANGE MASTER.
Sat Apr 23 13:52:36 2022 - [info]  Slave started.
Sat Apr 23 13:52:36 2022 - [info] All new slave servers switched successfully.
Sat Apr 23 13:52:36 2022 - [info]
Sat Apr 23 13:52:36 2022 - [info] * Phase 5: New master cleanup phase..
Sat Apr 23 13:52:36 2022 - [info]
Sat Apr 23 13:52:36 2022 - [info]  172.28.81.2: Resetting slave info succeeded.
Sat Apr 23 13:52:36 2022 - [info] Switching master to 172.28.81.2(172.28.81.2:3306) completed successfully.
|
检查
vip已经成功转到了mysql master机器上,slave机器的都变成了mysql master的从了

