Apache APISIX 是一个基于 OpenResty 和 Etcd 实现的动态、实时、高性能的 API 网关,目前已经是 Apache 的顶级项目。提供了丰富的流量管理功能,如负载均衡、动态路由、动态 upstream、A/B测试、金丝雀发布、限速、熔断、防御恶意攻击、认证、监控指标、服务可观测性、服务治理等。可以使用 APISIX 来处理传统的南北流量以及服务之间的东西向流量。
与传统 API 网关相比,APISIX 具有动态路由和热加载插件功能,避免了配置之后的 reload 操作,同时 APISIX 支持 HTTP(S)、HTTP2、Dubbo、QUIC、MQTT、TCP/UDP 等更多的协议。而且还内置了 Dashboard,提供强大而灵活的界面。同样也提供了丰富的插件支持功能,而且还可以让用户自定义插件。

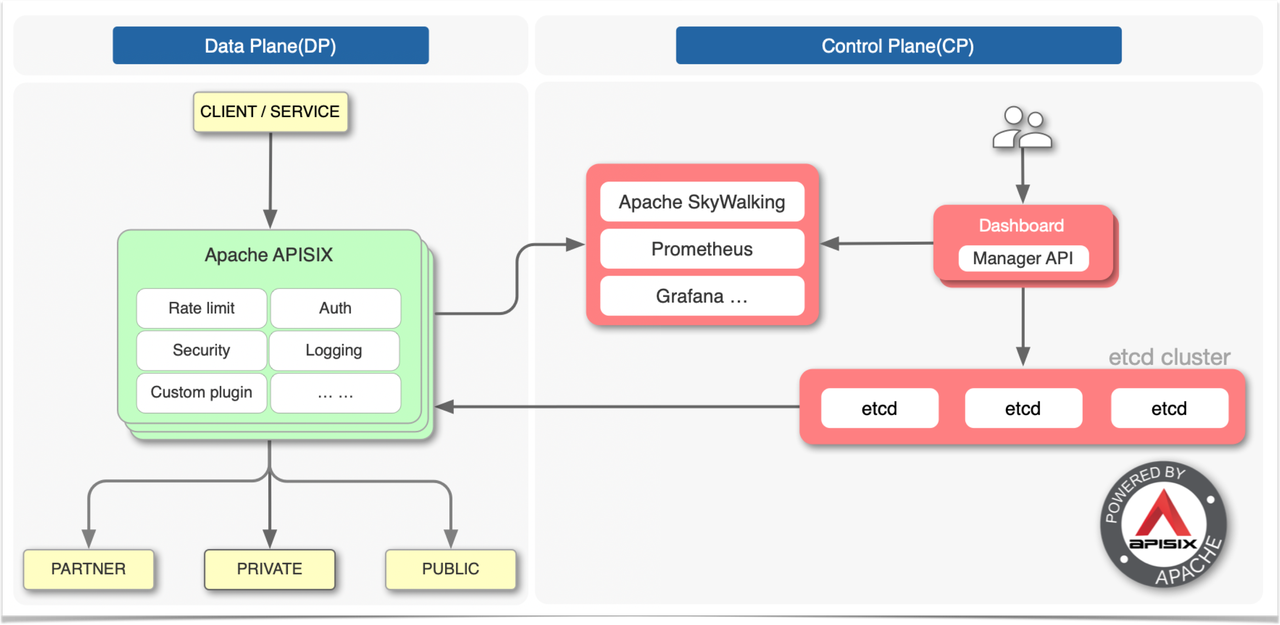
上图是 APISIX 的架构图,整体上分成数据面和控制面两个部分,控制面用来管理路由,主要通过 etcd 来实现配置中心,数据面用来处理客户端请求,通过 APISIX 自身来实现,会不断去 watch etcd 中的 route、upstream 等数据。

这是 APISIX 的生态图,从该图可以准确看到目前都支持了哪些周边生态。左侧是支持的协议,可以看到常见的 7 层协议有 HTTP(S)、HTTP2、Dubbo、QUIC 和物联网协议 MQTT 等,4 层协议有 TCP/UDP 。右侧部分则是一些开源或者 SaaS 服务,比如 SkyWalking、Prometheus 、Vault 等。下面就是一些比较常见的操作系统环境、云厂商和硬件环境。
Apisix Ingress
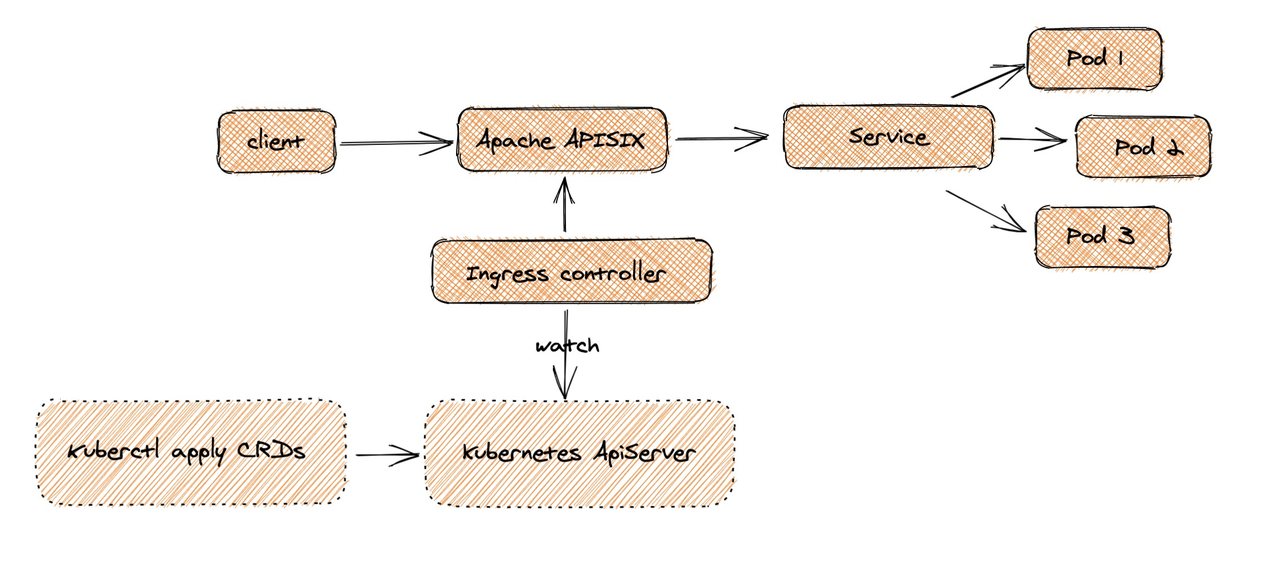
同样作为一个 API 网关,APISIX 也支持作为 Kubernetes 的一个 Ingress 控制器进行使用。APISIX Ingress 在架构上分成了两部分,一部分是 APISIX Ingress Controller,作为控制面它将完成配置管理与分发。另一部分 APISIX(代理) 负责承载业务流量。

当 Client 发起请求,到达Apache APISIX后,会直接把相应的业务流量传输到后端(如 Service Pod),从而完成转发过程。此过程不需要经过Ingress Controller,这样做可以保证一旦有问题出现,或者是进行变更、扩缩容或者迁移处理等,都不会影响到用户和业务流量。
同时在配置端,用户通过kubectl apply,可将自定义 CRD 配置应用到 K8s 集群。Ingress Controller 会持续 watch 这些资源变更,来将相应配置应用到 Apache APISIX。
从上图中可以看出,APISIX Ingress 采用了数据面与控制面的分离架构,所以用户可以选择将数据面部署在 K8s 集群内部/外部。但 K8s Ingress Nginx 是将控制面和数据面放在了同一个 Pod 中,如果 Pod 或控制面出现一点闪失,整个 Pod 就会挂掉,进而影响到业务流量。这种架构分离,给用户提供了比较方便的部署选择,同时在业务架构调整场景下,也方便进行相关数据的迁移与使用。
Apisix Ingress 特性说明
由于 Apache APISIX 是一个全动态的高性能网关,所以在 APISIX Ingress 自身就支持了全动态,包括路由、SSL 证书、上游以及插件等等。
APISIX Ingress 支持的特性如下:
- 支持 CRD,更容易理解声明式配置
- 支持高级路由匹配规则以及自定义资源,可与 Apache APISIX 官方 50 多个插件 & 客户自定义插件进行扩展使用
- 支持 K8s 原生 Ingress 配置
- 支持流量切分
- 支持 gRPC plaintext 与 TCP 4 层代理
- 服务自动注册发现,无惧扩缩容
- 更灵活的负载均衡策略,自带健康检查功能
安装
我们这里在 Kubernetes 集群中来使用 APISIX,可以通过 Helm Chart 来进行安装,首先添加官方提供的 Helm Chart 仓库:
1
2
|
helm repo add apisix https://charts.apiseven.com
helm repo update
|
由于 APISIX 的 Chart 包中包含 dashboard 和 ingress 控制器的依赖,我们只需要在 values 中启用即可安装 ingress 控制器了:
1
2
3
4
5
6
|
helm search repo |grep apisix
apisix/apisix                               	0.9.0        	2.13.0                 	A Helm chart for Apache APISIX
apisix/apisix-dashboard                     	0.4.0        	2.10.1                 	A Helm chart for Apache APISIX Dashboard
apisix/apisix-ingress-controller            	0.9.0        	1.4.0                  	Apache APISIX Ingress Controller for Kubernetes
# 选择apisix的chart即可
helm pull apisix/apisix
|
在 apisix跟 目录中修改用于安装的 values 文件,添加apisix绑定节点,etcd添加绑定节点和绑定pod,并配置sc,开启dashboard,修改完后,内容如下所示:
  1
  2
  3
  4
  5
  6
  7
  8
  9
 10
 11
 12
 13
 14
 15
 16
 17
 18
 19
 20
 21
 22
 23
 24
 25
 26
 27
 28
 29
 30
 31
 32
 33
 34
 35
 36
 37
 38
 39
 40
 41
 42
 43
 44
 45
 46
 47
 48
 49
 50
 51
 52
 53
 54
 55
 56
 57
 58
 59
 60
 61
 62
 63
 64
 65
 66
 67
 68
 69
 70
 71
 72
 73
 74
 75
 76
 77
 78
 79
 80
 81
 82
 83
 84
 85
 86
 87
 88
 89
 90
 91
 92
 93
 94
 95
 96
 97
 98
 99
100
101
102
103
104
105
106
107
108
109
110
111
112
113
114
115
116
117
118
119
120
121
122
123
124
125
126
127
128
129
130
131
132
133
134
135
136
137
138
139
140
141
142
143
144
145
146
147
148
149
150
151
152
153
154
155
156
157
158
159
160
161
162
163
164
165
166
167
168
169
170
171
172
173
174
175
176
177
178
179
180
181
182
183
184
185
186
187
188
189
190
191
192
193
194
195
196
197
198
199
200
201
202
203
204
205
206
207
208
209
210
211
212
213
214
215
216
217
218
219
220
221
222
223
224
225
226
227
228
229
230
231
232
233
234
235
236
237
238
239
240
241
242
243
244
245
246
247
248
249
250
251
252
253
254
255
256
257
258
259
260
261
262
263
264
265
266
267
268
269
270
271
272
273
274
275
276
277
278
279
280
281
282
283
284
285
286
287
288
289
290
291
292
293
294
295
296
297
298
299
300
301
302
303
304
305
306
307
308
309
310
311
312
313
314
315
316
317
318
319
320
321
322
323
324
325
326
327
328
329
330
331
332
333
334
335
336
337
338
339
340
341
342
343
344
345
346
347
348
349
350
351
352
353
354
355
356
357
358
359
360
361
362
363
364
365
366
367
368
369
370
371
372
373
374
375
376
377
378
379
380
381
382
383
384
385
386
387
388
389
390
391
392
393
394
395
396
397
398
399
400
401
402
403
404
405
406
407
408
409
410
411
412
413
414
415
416
417
418
419
420
421
|
#
# Licensed to the Apache Software Foundation (ASF) under one or more
# contributor license agreements.  See the NOTICE file distributed with
# this work for additional information regarding copyright ownership.
# The ASF licenses this file to You under the Apache License, Version 2.0
# (the "License"); you may not use this file except in compliance with
# the License.  You may obtain a copy of the License at
#
#     http://www.apache.org/licenses/LICENSE-2.0
#
# Unless required by applicable law or agreed to in writing, software
# distributed under the License is distributed on an "AS IS" BASIS,
# WITHOUT WARRANTIES OR CONDITIONS OF ANY KIND, either express or implied.
# See the License for the specific language governing permissions and
# limitations under the License.

global:
  imagePullSecrets: []
  storageClass: local-etcd

apisix:
  # Enable or disable Apache APISIX itself
  # Set it to false and ingress-controller.enabled=true will deploy only ingress-controller
  enabled: true

  # Enable nginx IPv6 resolver
  enableIPv6: true

  # Use Pod metadata.uid as the APISIX id.
  setIDFromPodUID: false

  customLuaSharedDicts: []
    # - name: foo
    #   size: 10k
    # - name: bar
    #   size: 1m
  luaModuleHook:
    enabled: false
    # extend lua_package_path to load third party code
    luaPath: ""
    # the hook module which will be used to inject third party code into APISIX
    # use the lua require style like: "module.say_hello"
    hookPoint: ""
    # configmap that stores the codes
    configMapRef:
      name: ""
      # mounts decides how to mount the codes to the container.
      mounts:
      - key: ""
        path: ""

  enableCustomizedConfig: false
  customizedConfig: {}

  image:
    repository: apache/apisix
    pullPolicy: IfNotPresent
    # Overrides the image tag whose default is the chart appVersion.
    tag: 2.13.0-alpine

  replicaCount: 3

  podAnnotations: {}
  podSecurityContext: {}
    # fsGroup: 2000
  securityContext: {}
    # capabilities:
    #   drop:
    #   - ALL
    # readOnlyRootFilesystem: true
    # runAsNonRoot: true
    # runAsUser: 1000

  # See https://kubernetes.io/docs/tasks/run-application/configure-pdb/ for more details
  podDisruptionBudget:
    enabled: false
    minAvailable: 90%
    maxUnavailable: 1

  resources: {}
    # We usually recommend not to specify default resources and to leave this as a conscious
    # choice for the user. This also increases chances charts run on environments with little
    # resources, such as Minikube. If you do want to specify resources, uncomment the following
    # lines, adjust them as necessary, and remove the curly braces after 'resources:'.
    # limits:
    #   cpu: 100m
    #   memory: 128Mi
    # requests:
    #   cpu: 100m
    #   memory: 128Mi

  nodeSelector: {}
  tolerations: []
  affinity:
    nodeAffinity:
      requiredDuringSchedulingIgnoredDuringExecution:  # 硬策略
        nodeSelectorTerms:
        - matchExpressions:
          - key: kubernetes.io/hostname
            operator: In
            values:
            - node01
            - node02
            - node03
    # podAntiAffinity:
    #   requiredDuringSchedulingIgnoredDuringExecution:
    #     - labelSelector:
    #         matchExpressions:
    #           - key: "app.kubernetes.io/name"
    #             operator: In
    #             values:
    #             - apisix
    #       topologyKey: "kubernetes.io/hostname"
  # If true, it will sets the anti-affinity of the Pod.
  podAntiAffinity:
    enabled: false

nameOverride: ""
fullnameOverride: ""


gateway:
  type: NodePort
  # If you want to keep the client source IP, you can set this to Local.
  # ref: https://kubernetes.io/docs/tasks/access-application-cluster/create-external-load-balancer/#preserving-the-client-source-ip
  externalTrafficPolicy: Cluster
  # type: LoadBalancer
  # annotations:
  #   service.beta.kubernetes.io/aws-load-balancer-type: nlb
  externalIPs: []
  http:
    enabled: true
    servicePort: 80
    containerPort: 9080
  tls:
    enabled: false
    servicePort: 443
    containerPort: 9443
    existingCASecret: ""
    certCAFilename: ""
    http2:
      enabled: true
  stream:  # L4 proxy (TCP/UDP)
    enabled: false
    only: false
    tcp: []
    udp: []
  ingress:
    enabled: false
    annotations: {}
      # kubernetes.io/ingress.class: nginx
      # kubernetes.io/tls-acme: "true"
    hosts:
      - host: apisix.local
        paths: []
    tls: []
  #  - secretName: apisix-tls
  #    hosts:
  #      - chart-example.local


admin:
  # Enable Admin API
  enabled: true
  # admin service type
  type: ClusterIP
  # loadBalancerIP: a.b.c.d
  # loadBalancerSourceRanges:
  #   - "143.231.0.0/16"
  externalIPs: []
  #
  port: 9180
  servicePort: 9180
  # Admin API support CORS response headers
  cors: true
  # Admin API credentials
  credentials:
    admin: edd1c9f034335f136f87ad84b625c8f1
    viewer: 4054f7cf07e344346cd3f287985e76a2

  allow:
    # The ip range for allowing access to Apache APISIX
    ipList:
      - 127.0.0.1/24


# APISIX plugins to be enabled
plugins:
  - api-breaker
  - authz-keycloak
  - basic-auth
  - batch-requests
  - consumer-restriction
  - cors
  - echo
  - fault-injection
  - grpc-transcode
  - hmac-auth
  - http-logger
  - ip-restriction
  - ua-restriction
  - jwt-auth
  - kafka-logger
  - key-auth
  - limit-conn
  - limit-count
  - limit-req
  - node-status
  - openid-connect
  - authz-casbin
  - prometheus
  - proxy-cache
  - proxy-mirror
  - proxy-rewrite
  - redirect
  - referer-restriction
  - request-id
  - request-validation
  - response-rewrite
  - serverless-post-function
  - serverless-pre-function
  - sls-logger
  - syslog
  - tcp-logger
  - udp-logger
  - uri-blocker
  - wolf-rbac
  - zipkin
  - traffic-split
  - gzip
  - real-ip
  - ext-plugin-pre-req
  - ext-plugin-post-req
stream_plugins:
  - mqtt-proxy
  - ip-restriction
  - limit-conn

pluginAttrs: {}

extPlugin:
  enabled: false
  cmd: ["/path/to/apisix-plugin-runner/runner", "run"]

# customPlugins allows you to mount your own HTTP plugins.
customPlugins:
  enabled: false
  # the lua_path that tells APISIX where it can find plugins,
  # note the last ';' is required.
  luaPath: "/opts/custom_plugins/?.lua"
  plugins:
      # plugin name.
    - name: ""
      # plugin attrs
      attrs: |
      # plugin codes can be saved inside configmap object.
      configMap:
        # name of configmap.
        name: ""
        # since keys in configmap is flat, mountPath allows to define the mount
        # path, so that plugin codes can be mounted hierarchically.
        mounts:
          - key: ""
            path: ""
          - key: ""
            path: ""

extraVolumes: []
# - name: extras
#   emptyDir: {}

extraVolumeMounts: []
# - name: extras
#   mountPath: /usr/share/extras
#   readOnly: true

discovery:
  enabled: false
  registry:
      # Integration service discovery registry. E.g eureka\dns\nacos\consul_kv
      # reference:
      # https://apisix.apache.org/docs/apisix/discovery#configuration-for-eureka
      # https://apisix.apache.org/docs/apisix/discovery/dns#service-discovery-via-dns
      # https://apisix.apache.org/docs/apisix/discovery/consul_kv#configuration-for-consul-kv
      # https://apisix.apache.org/docs/apisix/discovery/nacos#configuration-for-nacos
      #
      # an eureka example:
      # eureka:
      #   host:
      #     - "http://${username}:${password}@${eureka_host1}:${eureka_port1}"
      #     - "http://${username}:${password}@${eureka_host2}:${eureka_port2}"
      #   prefix: "/eureka/"
      #   fetch_interval: 30
      #   weight: 100
      #   timeout:
      #     connect: 2000
      #     send: 2000
      #     read: 5000

# access log and error log configuration
logs:
  enableAccessLog: true
  accessLog: "/dev/stdout"
  accessLogFormat: '$remote_addr - $remote_user [$time_local] $http_host \"$request\" $status $body_bytes_sent $request_time \"$http_referer\" \"$http_user_agent\" $upstream_addr $upstream_status $upstream_response_time \"$upstream_scheme://$upstream_host$upstream_uri\"'
  accessLogFormatEscape: default
  errorLog: "/dev/stderr"
  errorLogLevel: "warn"

dns:
  resolvers:
    - 127.0.0.1
    - 172.20.0.10
    - 114.114.114.114
    - 223.5.5.5
    - 1.1.1.1
    - 8.8.8.8
  validity: 30
  timeout: 5


autoscaling:
  enabled: false
  minReplicas: 1
  maxReplicas: 100
  targetCPUUtilizationPercentage: 80
  targetMemoryUtilizationPercentage: 80

# Custom configuration snippet.
configurationSnippet:
  main: |

  httpStart: |

  httpEnd: |

  httpSrv: |

  httpAdmin: |

  stream: |

# Observability configuration.
# ref: https://apisix.apache.org/docs/apisix/plugins/prometheus/
serviceMonitor:
  enabled: false
  # namespace where the serviceMonitor is deployed, by default, it is the same as the namespace of the apisix
  namespace: ""
  # name of the serviceMonitor, by default, it is the same as the apisix fullname
  name: ""
  # interval at which metrics should be scraped
  interval: 15s
  # path of the metrics endpoint
  path: /apisix/prometheus/metrics
  # prefix of the metrics
  metricPrefix: apisix_
  # container port where the metrics are exposed
  containerPort: 9091
  # @param serviceMonitor.labels ServiceMonitor extra labels
  labels: {}
  # @param serviceMonitor.annotations ServiceMonitor annotations
  annotations: {}

# etcd configuration
# use the FQDN address or the IP of the etcd
etcd:
  # install etcd(v3) by default, set false if do not want to install etcd(v3) together
  enabled: true
  host:
    - http://etcd.host:2379  # host or ip e.g. http://172.20.128.89:2379
  prefix: "/apisix"
  timeout: 30

  # if etcd.enabled is true, set more values of bitnami/etcd helm chart
  auth:
    rbac:
      # No authentication by default
      enabled: false
      user: ""
      password: ""
    tls:
      enabled: false
      existingSecret: ""
      certFilename: ""
      certKeyFilename: ""
      verify: true
      sni: ""

  service:
    port: 2379

  replicaCount: 3
  persistence:
    storageClassName: local-etcd
  affinity:
    nodeAffinity:
      requiredDuringSchedulingIgnoredDuringExecution:  # 硬策略
        nodeSelectorTerms:
        - matchExpressions:
          - key: kubernetes.io/hostname
            operator: In
            values:
            - node01
            - ndoe02
            - node03
    podAntiAffinity:
      requiredDuringSchedulingIgnoredDuringExecution:
        - labelSelector:
            matchExpressions:
              - key: "app.kubernetes.io/name"
                operator: In
                values:
                - etcd
          topologyKey: "kubernetes.io/hostname"


dashboard:
  enabled: true


ingress-controller:
  enabled: false
|
APISIX 需要依赖 etcd,默认情况下 Helm Chart 会自动安装一个3副本的 etcd 集群,需要提供一个默认的 StorageClass,如果你已经有默认的存储类则可以忽略下面的步骤,这里我们使用local-hostpath模式安装sc,使用本地磁盘的性能,所以这里在charts下etcd目录下的templates中添加sc,文件内容如下
1
2
3
4
5
6
|
kind: StorageClass
apiVersion: storage.k8s.io/v1
metadata:
  name: local-etcd
provisioner: kubernetes.io/no-provisioner
volumeBindingMode: WaitForFirstConsumer
|
并且还需手动创建pv,文件内容如下:
 1
 2
 3
 4
 5
 6
 7
 8
 9
10
11
12
13
14
15
16
17
18
19
20
21
22
23
24
25
26
27
28
29
30
31
32
33
34
35
36
37
38
39
40
41
42
43
44
45
46
47
48
49
50
51
52
53
54
55
56
57
58
59
60
61
62
63
64
65
66
67
68
69
|
---
apiVersion: v1
kind: PersistentVolume
metadata:
  name: local-etcd-pv-1
spec:
  capacity:
    storage: 20Gi
  volumeMode: Filesystem
  accessModes:
  - ReadWriteOnce
  persistentVolumeReclaimPolicy: Retain
  storageClassName: local-etcd
  local:
    path: /data/apisix-data
  nodeAffinity:
    required:
      nodeSelectorTerms:
      - matchExpressions:
        - key: kubernetes.io/hostname
          operator: In
          values:
          - node01
---
apiVersion: v1
kind: PersistentVolume
metadata:
  name: local-etcd-pv-2
spec:
  capacity:
    storage: 20Gi
  volumeMode: Filesystem
  accessModes:
  - ReadWriteOnce
  persistentVolumeReclaimPolicy: Retain
  storageClassName: local-etcd
  local:
    path: /data/apisix-data
  nodeAffinity:
    required:
      nodeSelectorTerms:
      - matchExpressions:
        - key: kubernetes.io/hostname
          operator: In
          values:
          - node02
---
apiVersion: v1
kind: PersistentVolume
metadata:
  name: local-etcd-pv-3
spec:
  capacity:
    storage: 20Gi
  volumeMode: Filesystem
  accessModes:
  - ReadWriteOnce
  persistentVolumeReclaimPolicy: Retain
  storageClassName: local-etcd
  local:
    path: /data/apisix-data
  nodeAffinity:
    required:
      nodeSelectorTerms:
      - matchExpressions:
        - key: kubernetes.io/hostname
          operator: In
          values:
          - node03
|
还需在对应绑定的node节点上创建yaml文件中绑定的path,如/data/apisix-data, 执行命令如下(绑定的所有ndoe节点都要执行):
1
|
mdkir -pv /data/apisix-data
|
然后在包含apisix的chart目录外,直接执行下面的命令进行一键安装:
1
2
3
4
5
6
|
helm upgrade --install apisix apisix/ -n kube-system --debug
NOTES:
1. Get the application URL by running these commands:
  export NODE_PORT=$(kubectl get --namespace kube-system -o jsonpath="{.spec.ports[0].nodePort}" services apisix-gateway)
  export NODE_IP=$(kubectl get nodes --namespace kube-system -o jsonpath="{.items[0].status.addresses[0].address}")
  echo http://$NODE_IP:$NODE_PORT
|
 1
 2
 3
 4
 5
 6
 7
 8
 9
10
11
12
13
14
|
kubectl get po -A |grep apisix
kube-system   apisix-69b64f4db5-4b55v                                1/1
kube-system   apisix-69b64f4db5-68qmz                                1/1
kube-system   apisix-69b64f4db5-tcfhv                                1/1
kube-system   apisix-dashboard-5ddb9df66b-zkkbf                      1/1
kube-system   apisix-etcd-0                                          1/1
kube-system   apisix-etcd-1                                          1/1
kube-system   apisix-etcd-2                                          1/1
kubectl get svc -A |grep apisix
kube-system   apisix-admin           ClusterIP   192.168.0.10     <none>        9180/TCP
kube-system   apisix-dashboard       NodePort    192.168.0.11      <none>        80:30606/TCP
kube-system   apisix-etcd            ClusterIP   192.168.0.200    <none>        2379/TCP,2380/TCP
kube-system   apisix-etcd-headless   ClusterIP   None              <none>        2379/TCP,2380/TCP
kube-system   apisix-gateway         NodePort    192.168.0.22    <none>        80:32687/TCP
|
测试
现在我们可以为 Dashboard 创建一个路由规则,新建一个如下所示的 ApisixRoute 资源对象即可:
 1
 2
 3
 4
 5
 6
 7
 8
 9
10
11
12
13
14
15
16
17
18
19
20
21
22
|
apiVersion: apisix.apache.org/v2beta3
kind: ApisixRoute
metadata:
  name: foo-bar-route
spec:
  http:
  - name: foo
    match:
      hosts:
      - foo.com
      paths:
      - "/foo*"
    backends:
     - serviceName: foo
       servicePort: 80
  - name: bar
    match:
      paths:
        - "/bar"
    backends:
      - serviceName: bar
        servicePort: 80
|
创建后 apisix-ingress-controller 会将上面的资源对象通过 admin api 映射成 APISIX 中的配置。
可以使用两种路径类型prefix,exact默认为exact,如果prefix需要,只需附加一个*,例如,/id/*匹配前缀为 的所有路径/id/
所以其实我们的访问入口是 APISIX,而 apisix-ingress-controller 只是一个用于监听 crds,然后将 crds 翻译成 APISIX 的配置的工具而已,目前环境中并未安装apisix-ingress-controller,如果安装就可以直接使用apxisix的gateway去访问dashoboard,本次直接使用dashboard的NodePort去访问即可:

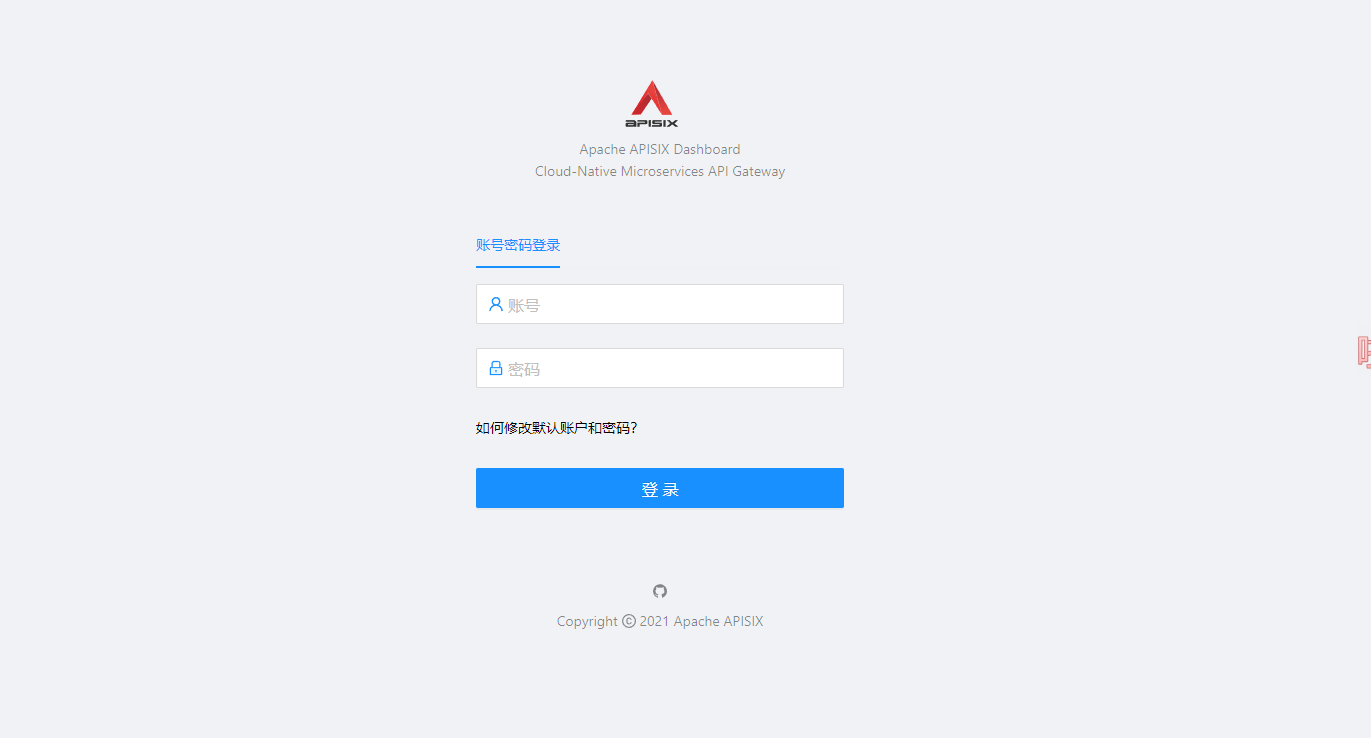
默认登录用户名和密码都是 admin,登录后,直接在控制台上创建路由即可,路由菜单下正常可以看到路由:

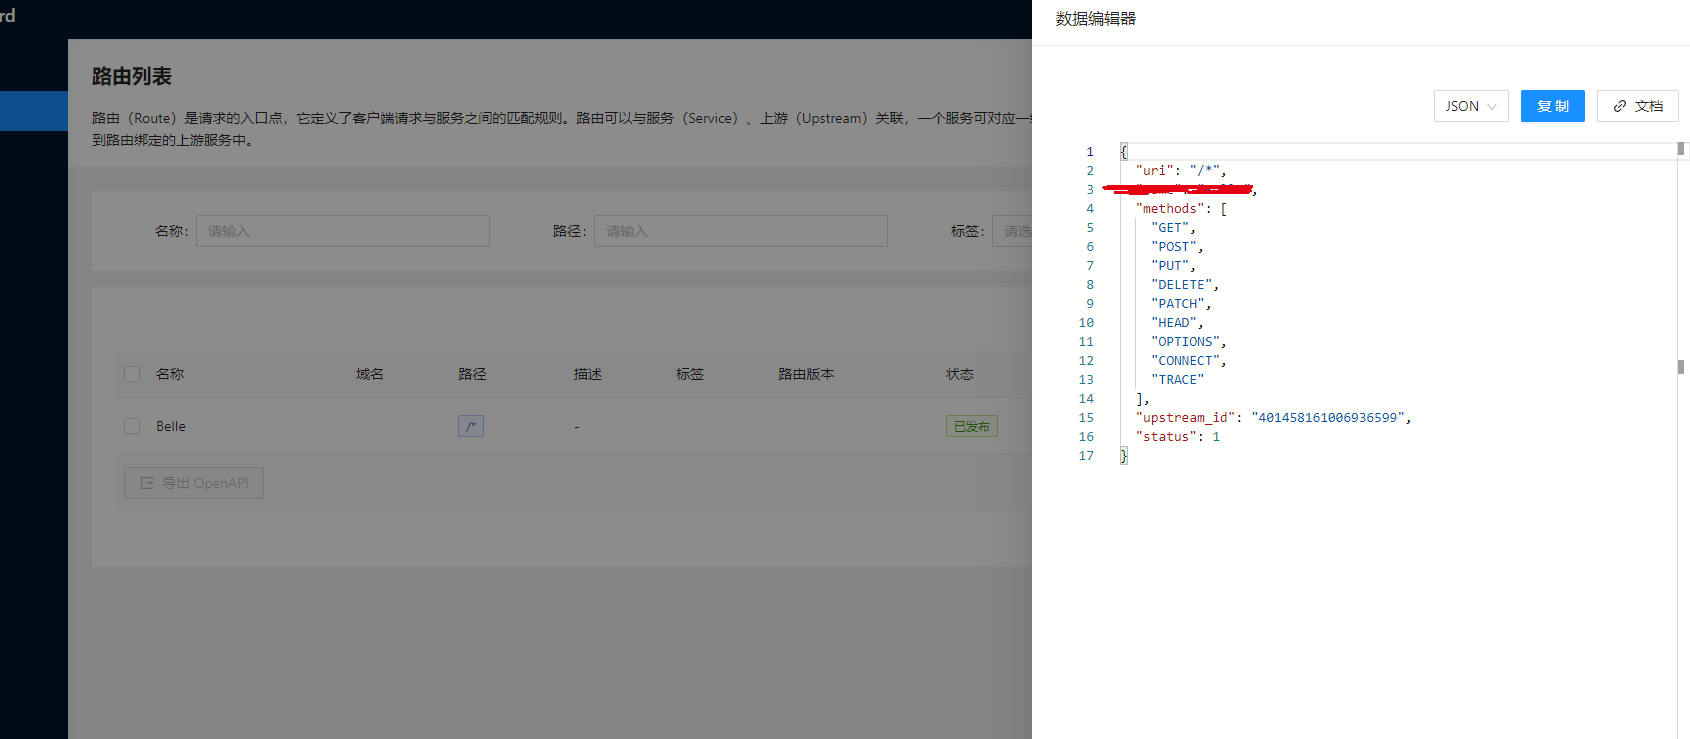
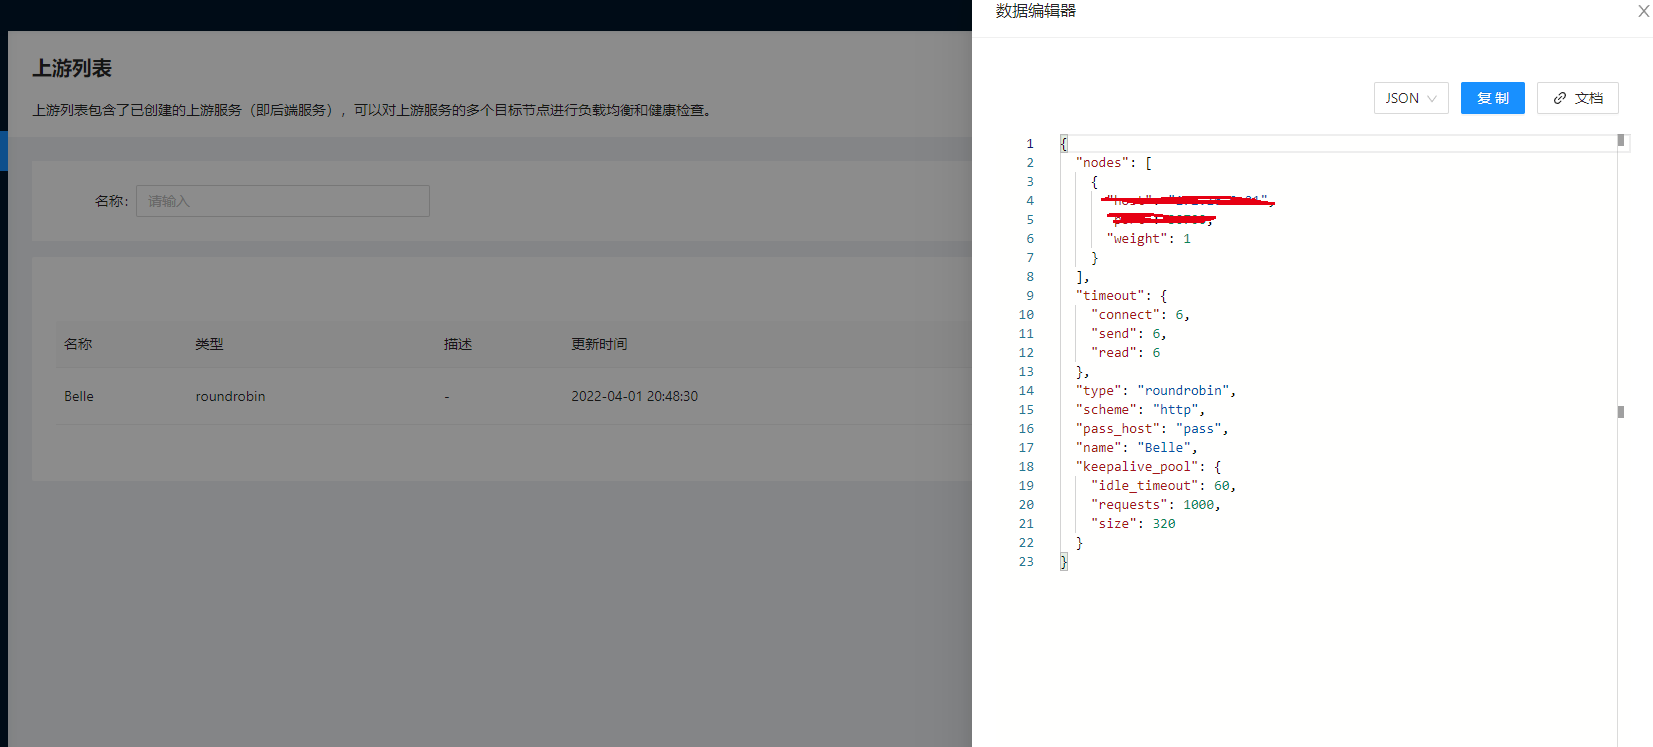
点击更多下面的查看就可以看到在 APISIX 下面真正的路由配置信息:

所以我们要使用 APISIX,也一定要理解其中的路由 Route 这个概念,路由(Route)是请求的入口点,它定义了客户端请求与服务之间的匹配规则,路由可以与服务(Service)、上游(Upstream)关联,一个服务可对应一组路由,一个路由可以对应一个上游对象(一组后端服务节点),因此,每个匹配到路由的请求将被网关代理到路由绑定的上游服务中。
理解了路由后自然就知道了我们还需要一个上游 Upstream 进行关联,这个概念和 Nginx 中的 Upstream 基本是一致的,在上游菜单下可以看到一些上游服务:

其实就是将 Kubernetes 中的 Endpoints 映射成 APISIX 中的 Upstream,然后我们可以自己在 APISIX 这边进行负载。
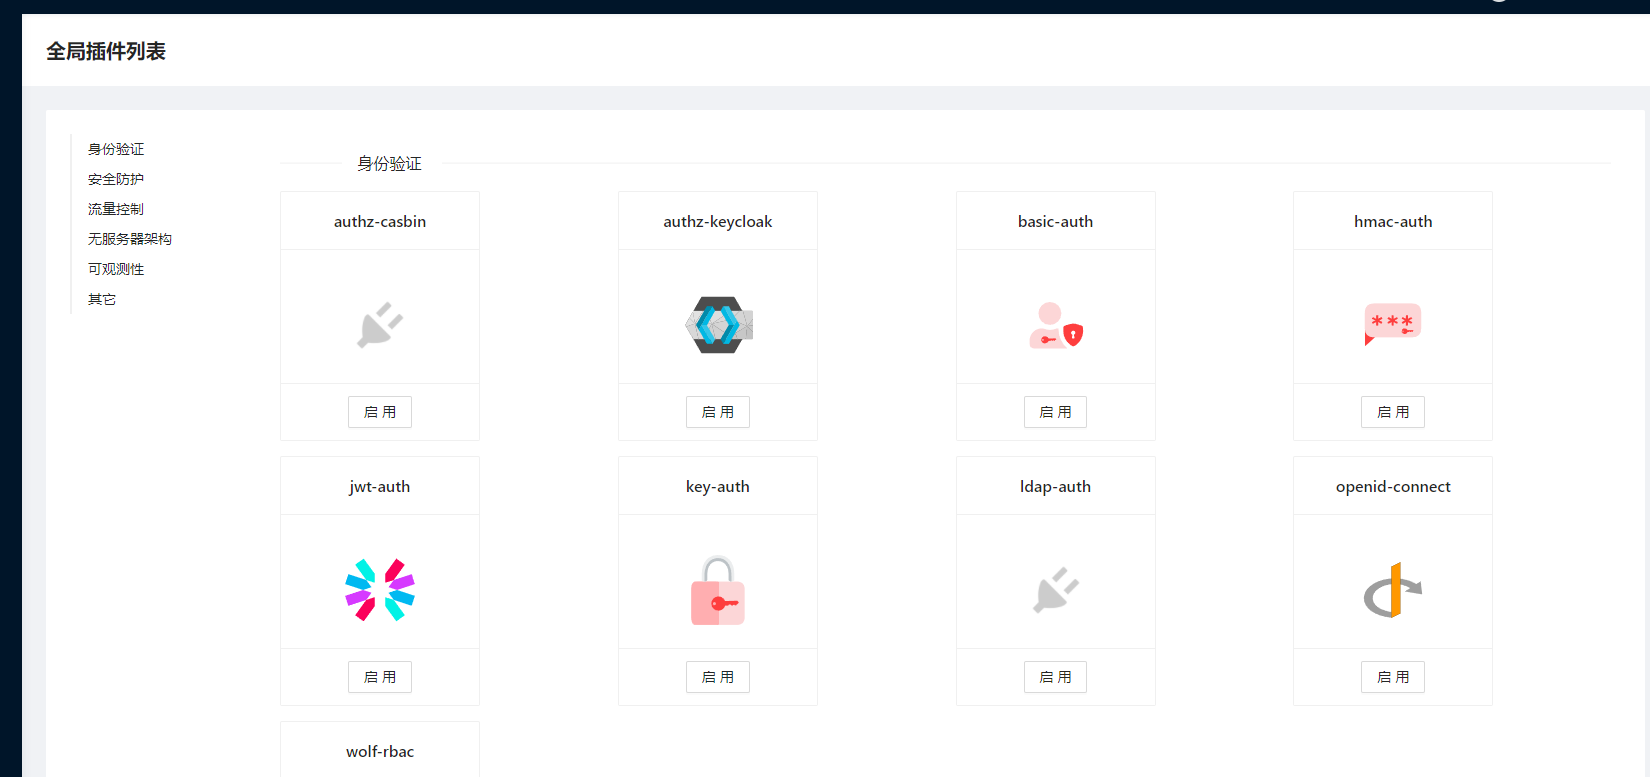
APISIX 提供的 Dashboard 功能还是非常全面的,我们甚至都可以直接在页面上进行所有的配置,包括插件这些,非常方便。

当然还有很多其他高级的功能,比如流量切分、请求认证等等,这些高级功能在 crds 中去使用则更加方便了,当然也是支持原生的 Ingress 资源对象的,关于 APISIX 的更多高级用法,后续再进行说明。
